


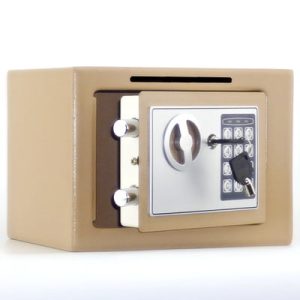
LS318-H2
- SIZE H200*W420*D370MM, 11KG
- PACKING 25X44X39 cm, 12KG
Multifunctional DT proximity card manual
1. Password and proximity card settings and modifications
1. Modify the master password and master card
① Modify the master password: when the door is open
Enter “*” + “*” to display “PROG”;
Enter "842627" + "#", and "OLD" will be displayed;
Enter the original master password, the factory master password is "000000" + "#", and "NEW" is displayed;
Enter the new 6-digit master password + "#", "GOOD" is displayed, and the modification is successful.
② Modify the main card: when the door is open
Enter “*”+“*” and “PROG” will be displayed.
Enter “726248” + “#” to display “CARD”
Place the new card in the sensor position, and "GOOD" will be displayed. If the modification is successful, it means that the card is the main card.
2. Modify customer password and customer card
① Modify customer password: in unboxing state
Enter a new 3-6 digit customer password;
Press “#” to display “CLOSED” and lock the door at the same time.
② Modify the passenger card: in the unpacking state
● Place the new passenger card at the sensing position, "CLOSED" will be displayed, and the door will be locked at the same time.
3. Open the box with customer password: When the box is closed with customer password, enter the preset customer password, "OPENED" will be displayed, and the door will be opened at the same time.
4. Unpacking the passenger card: When the passenger card is closed, place the passenger card at the sensing position, "OPENED" will be displayed, and the door will be opened at the same time.
5. Unboxing with master password: in the closed state
Press "#" twice in succession, "SUPER" is displayed. Enter the current master password (the factory master password is "000000"), "OPENED" is displayed, and the door is opened at the same time.
2. Clock setting
In the door-opening state, input "*" + "*" to display "PROG"; press "055261" + "#" to display "DATE" and the clock setting program starts.
First screen data:
1 2 3 4 5 6
Where "1" and "2" represent the year
"3" and "4" represent months
"5" and "6" represent the day
Enter the year, month and day directly on the keyboard and press "#" to confirm
Second screen data:
1 2 3 4 5 6
where "1" and "2" represent hours
"3" and "4" represent minutes
"5" and "6" represent seconds
Enter hours, minutes, and seconds directly on the keyboard, press "#" to confirm, and "GOOD" will be displayed.
Note: Press "#" with the cursor anywhere on the first screen, and the display will jump to the second screen, and the current settings of the first screen will be confirmed;
If the cursor presses "#" anywhere on the second screen, "GOOD" will be displayed, and the current settings on the second screen will be confirmed and this operation will exit. If you make a mistake, you can delete it with "*".
3. Unpacking record query
In the unboxing state, query 100 records, enter "*" + "*" to display "PROG"; press "162550" + "#" to display "RECORD".
Enter the unboxing record query program. The unboxing record is divided into two screens. The keyboard function keys are as follows:
Press "2" to return to the previous record;
Press "8" to jump to the next record;
Press "4" to display the previous screen;
Press "6" to display the next screen;
Press "5" to return to the latest door opening record;
Press "*" to exit the query record function.
First display the first screen of the first record:
1 2 3 4 5 6
Where "1" and "2" represent the year
"3" and "4" represent months
"5" and "6" represent the day
Press "6" to enter the second screen;
7 8 9 10 11 12
Where "7" and "8" represent hours;
"9" and "10" represent minutes;
The 11th digit displays "—";
The 12th digit indicates the unlocking method, and different displayed values correspond to the following contents;
“1”—Customer password to open the box
“2”—Master password unboxing
“3”—CEU unboxing
“4”—Mechanical key unboxing
“5”—unboxing the passenger card
“6”—Unboxing the main card
“7”—Customer password and customer card unboxing
“8”—Master password and main card unboxing
“9”—System on or off
"A"—LOCK(#) number to close the box
“B”—Passenger card box
"C"—Wrong password
"D" – Failed to close the box
“E”—Unboxing failed
"F" – card error
Press "*" to exit after querying, and "GOOD" is displayed.
4. Parameter settings (settings of various functions of the safe)
(Factory setting) 1 1 1 1 2 1 4 7 0 5 4 0
In the unboxing state, type "*" + "*" to display "PROG"; press "711469" + "#" to display "CODE"
Enter the setting program, the parameters are displayed on two screens, each screen has six digits.
First screen:
1 2 3 4 5 6
The above numbers only represent the position displayed on the digital screen. There are six parameters in total. For each parameter, you can select the corresponding function and type the number directly on the keyboard, as follows:
1. Show password
Type "1" – the password will be displayed when inputting. If you type "*" before inputting, the password will not be displayed, and the password will not be echoed after locking the box.
Type “0”—Do not display the password when typing
2. The password will be displayed after locking the box.
Type “0”—do not echo the password
Type "1" – echo password
3. Display switching function
Press "0" – "*" key to display that the switching function is disabled
Type "1" – type "*" before entering the password, the password will not be displayed, and it will not be echoed after locking the box.
4. Type "1" to query the latest 100 unboxing records
5. Lock box method selection
Type "1" – to lock the box for the first time after power on, you must enter the password and press the "#" key. The password or card will be memorized. When locking the box again, you are prohibited from entering the password or card. You must press the "#" key. Lock the box, or card until the next power-up. To open the door, you need to enter the password and press "#" or the card, and to close the door, you only need to press the "#" key, which is suitable for family use.
Type "2" – you must enter the password every time you lock the box and press "#" to confirm or card. You can use different passwords or cards. You need to enter the password or card to open and close the door. It is suitable for hotels.
Type "3" – enter the password after the system is powered on. Press the "#" key and swipe the card at the same time to lock the box. However, the password and card can only be changed the next time the system is powered on. The order of password input and card entry is arbitrary. Normally, you need to enter the password and swipe the card to open the door, and press the "#" key to close the door.
6. Type “1”
Press the "#" key to jump to the second screen:
1 2 3 4 5 6
The above numbers only represent the position displayed on the digital screen. There are six parameters in total. For each parameter, you can select the corresponding function and type the number directly on the keyboard. The details are as follows:
1. Number of incorrect inputs
Type 1-9 numbers to determine the number of incorrect password entries or illegal card entries before the system is locked.
2. Number of password digits
Type “3”—three-digit password
Type “4”—four-digit password
Type “5”—five-digit password
Type “6”—six-digit password
Type "7" – enter any 3-6 digit password and the system will automatically recognize it.
3 and 4. System lock time
Type 00-99 to set the system lock time, unit: minutes
5. Master password, master card
Type "0" – do not use the master password master card
Type “1”—use the master password instead of the master card
Type “2”—use the main card without using the master password
Type “3”—use both master password and master card
Type “4”—use master password or master card
6. Type “0”
Press the "#" key to confirm, and "GOOD" will be displayed to exit the operation.
Note: Press the "#" key when the cursor is at any position on the first screen, and the display will jump to the second screen and confirm the current settings of the first screen; when the cursor is at any position on the second screen, press the "#" key, and " GOOD", confirm the current settings of this screen and exit this operation.
多功能DT感应卡说明书
一、密码和感应卡设置及修改
1、修改主密码及主卡
①修改主密码:在开门状态下
- 输入“*”+“*”,显示“PROG”;
- 输入“842627”+“#”,显示“OLD”;
- 输入原主密码,出厂主密码为“000000”+“#”,显示“NEW”;
- 输入新6位主密码+“#”,显示“GOOD”,修改成功。
②修改主卡:在开门状态下
- 输入“*”+“*” ,显示“PROG”
- 输入“726248”+“#”,显示“CARD”
- 用新卡放在感应位置,显示“GOOD”,修改成功,表示该卡为主卡。
2、修改客密码及客卡
①修改客密码:在开箱状态下
- 输入新的3—6位客密码;
- 按“#”,显示“CLOSED”, 同时锁定箱门。
②修改客卡:在开箱状态下
● 把新客卡放在感应位置,显示“CLOSED”,同时锁定箱门。
3、客密码开箱:在客密码关箱状态下,输入预先设定的客密码,显示“OPENED”,同时箱门打开。
4、客卡开箱:在客卡关箱状态下,把客卡放在感应位置,显示“OPENED”,同时箱门打开。
5、主密码开箱:在关箱状态下
连续按两次“#”,显示:“SUPER”,输入当前主密码(出厂主密码为“000000”),显示“OPENED”,同时箱门打开。
二、时钟设定
在开门状态下,输入“*”+“*” 显示“PROG”;按“055261”+“#”,显示“DATE”,时钟设置程序启动。
第一屏数据:
1 2 3 4 5 6
其中“1”和“2”表示年
“3“和”4“表示月
“5”和“6”表示日
直接在键盘上输入年、月、日,按“#”确认
第二屏数据:
1 2 3 4 5 6
其中“1”和“2”表示小时
“3”和“4”表示分钟
“5”和“6”表示秒
直接在键盘上输入小时、分钟、秒,按“#”确认,显示“GOOD”
注:光标在第一屏任何位置按“#”, 显示即跳入第二屏,并对第一屏当前设置确认;
光标若在第二屏的任何位置按“#”,则显示“GOOD”,并对第二屏当前设置进行确认并退出本操作。若输入错误可用“*”删除。
三、开箱记录查询
开箱状态下,查询100条记录,输入“*”+“*” 显示“PROG”;按“162550”+“#”,显示“RECORD”,
进入查询开箱记录程序,开箱记录分为两屏,键盘功能键如下:
按“2”回到上一条记录;
按“8”跳到下一条记录;
按“4”显示上一屏;
按“6”显示下一屏;
按“5”回到最近的一次开门记录;
按“*”退出查询记录功能。
首先显示第一条记录的第一屏:
1 2 3 4 5 6
其中“1”和“2”表示年
“3”和“4”表示月
“5”和“6”表示日
按“6”进入第二屏;
7 8 9 10 11 12
其中“7”和“8”表示小时;
“9”和“10”表示分钟;
第11位显示“—”;
第12位表示开锁方式,不同显示数值对应以下内容;
“1”—客密码开箱
“2”—主密码开箱
“3”—CEU开箱
“4”—机械钥匙开箱
“5”—客卡开箱
“6”—主卡开箱
“7”—客密码和客卡开箱
“8”—主密码和主卡开箱
“9”—系统开或关
“A”—LOCK(#)号关箱
“B”—客卡关箱
“C”—密码错误
“D”—关箱失败
“E”—开箱失败
“F”—卡错误
查询结束按“*”退出,显示“GOOD”。
四、参数设置(保管箱各项功能的设定)
(出厂设置)1 1 1 1 2 1 4 7 0 5 4 0
开箱状态下,键入“*”+“*” 显示“PROG”;按“711469”+“#”,显示“CODE”
进入设置程序,参数分两屏显示,每屏六位数字
第一屏:
1 2 3 4 5 6
以上数字只代表数码屏显示的位置,共六项参数,每一项参数,每一项参数可选择相应功能直接在键盘键入数字,具体如下:
1、显示密码
- 键入“1”—输入时显示密码,如果在输入前键入“*”,密码不显示,锁箱后也不回显密码
- 键入“0”—输入时不显示密码
2、锁箱后回显密码
- 键入“0”—不回显密码
- 键入“1”—回显密码
3、显示切换功能
- 键入“0”—“*”键显示切换功能失效
- 键入“1”—输入密码前键入“*”,密码不显示,锁箱后也不回显
4、键入“1”,查询最近100条开箱记录
5、锁箱方式选择
- 键入“1”—上电后第一次锁箱必须输入密码后按“#”键,该密码或卡即被记忆,再次锁箱时禁止输入密码或卡,必须按“#”键才可锁箱,或卡一直到下次上电。开门需输入密码按“#”或卡,关门只要按“#”键,适合家庭使用。
- 键入“2”—每次锁箱必须输入密码按“#”确认或卡,可使用不同的密码或卡,开门关门需输入密码或卡,适合酒店使用。
- 键入“3”—系统上电后输入密码按“#”键同时需刷卡才能锁箱,但是只能在下次系统上电时更改密码和卡,密码输入和卡录入输入顺序随意。平时开门需输入密码和刷卡,关门按“#”键。
6、键入“1”
按“#”键,显示跳入第二屏:
1 2 3 4 5 6
以上数字只代表数码屏显示的位置,共六项参数,每一项参数可选择相应功能直接在键盘键入数字,具体如下:
1、错误输入次数
- 键入1—9数字确定系统锁定前错误密码输入或非法卡录入的次数。
2、密码位数
- 键入“3”—三位密码
- 键入“4”—四位密码
- 键入“5”—五位密码
- 键入“6”—六位密码
- 键入“7”—任意输入3—6位密码,系统自动识别。
3和4、系统锁定时间
- 键入00—99设定系统锁定时间,单位:分
5、主密码、主卡
- 键入“0”—不使用主密码主卡
- 键入“1”—使用主密码不使用主卡
- 键入“2”—使用主卡不使用主密码
- 键入“3”—同时使用主密码和主卡
- 键入“4”—使用主密码或主卡
6、键入“0”
按“#”键确认,显示“GOOD”退出操作。
注:光标在第一屏任何位置时按“#”键,显示即跳入第二屏并对第一屏当前设置确认;当光标在第二屏任何位置时,按“#”键,显示“GOOD”,对此屏当前设置确认并退出本操作。
| Weight | 15.00 kg |
|---|---|
| Dimensions | 44.00 × 47.00 × 27.00 cm |
Be the first to review “LS318-H2 Hotel Apartment Home Safe”
Related products


Kingland Safe Box


Kingland Safe Box


Kingland Safe Box

Kingland Safe Box
Kingland 25EA-Brown Digital Safe Box With Alarm, Keylock, LED


Kingland Safe Box


Kingland Safe Box


Kingland Safe Box
Kingland HJ-17TB-Blue Deposit Cash Front Drop Digital Safe Box

Kingland Safe Box
Kingland HJ-17TB-Gold Deposit Cash Front Drop Digital Safe Box
Reviews
There are no reviews yet.